How to Make a Wood Chair: A Step-by-Step Guide
Want to create a custom wood chair that’s both functional and stylish, but unsure where to start? Building your own chair may seem intimidating, but with the right guidance, even beginners can craft a sturdy, beautiful piece for their home. From choosing the wood to assembling the joints, each step matters to ensure comfort, durability, and a polished finish.
In “How to Make a Wood Chair: A Step-by-Step Guide,” we’ll walk you through the entire process. You’ll learn which tools and materials to use, how to measure and cut precisely, tips for assembling and reinforcing joints, and techniques for sanding and finishing your chair. By the end, you’ll have the knowledge and confidence to build a chair that’s truly your own creation.
👉 CLICK HERE to Unlock 16,000+ DIY woodworking plans now
Why Build Your Own Wood Chair?
Before diving into the details, let’s quickly talk about why DIYing a wooden chair is such a rewarding project:
- Save money on expensive store-bought furniture
- Customize size, comfort, and style to your space
- Learn valuable joinery and construction skills
- Feel proud sitting in something you built from scratch
Whether you’re a total newbie or a seasoned woodworker, creating your own chair is a satisfying and useful accomplishment.
👉 CLICK HERE to Unlock 16,000+ DIY woodworking plans now
Tools and Materials You’ll Nee
Before you begin, gather the right tools and materials. Here’s a simple list to get started:
Basic Tools:
- Tape measure
- Carpenter’s square
- Circular saw or miter saw
- Drill/driver
- Clamps
- Sander or sandpaper
- Wood glue
- Optional: Kreg pocket hole jig for easier joinery
Materials:
- Wood boards (typically hardwood like oak, maple, or pine for a beginner)
- Wood screws
- Wood filler
- Finishing nails
- Stain or paint (optional)
- Clear polyurethane or other finish
💡Pro Tip: Want a ready-to-go materials list and cut dimensions? Ted’s Woodworking includes blueprints and full parts lists for every type of chair — from rockers to recliners to rustic outdoor seats.
Step-by-Step: How to Build a Simple Wooden Chair
This plan is for a classic straight-back dining chair with clean lines and solid construction.
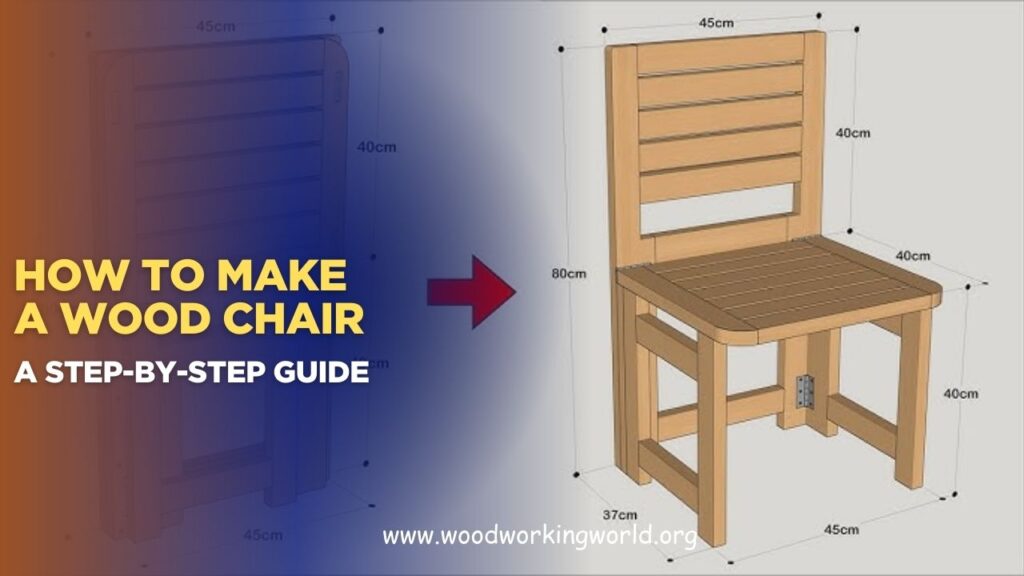
Step 1: Plan Your Chair Dimensions
Start with standard sizes:
- Seat height: 17–18 inches from floor
- Seat depth: 16–18 inches
- Backrest height: 32–36 inches
- Chair width: 17–20 inches
Sketch your design on paper or use a woodworking plan (like Ted’s) to visualize the structure.
Step 2: Cut the Wood Pieces
Using your saw, cut the following:
- 2 front legs
- 2 back legs (longer for the backrest)
- 2 side rails (for under the seat)
- 2 front/back rails
- 4 slats for the seat
- 2–3 vertical backrest slats
- 2 supports under the seat (optional)
Tip: Label each piece with a pencil so you don’t mix them up.
Step 3: Create Joinery
There are a few ways to join the pieces:
- Pocket hole joinery (fast and beginner-friendly)
- Mortise and tenon joints (more advanced and traditional)
- Dowels or biscuits (good for invisible joints)
Apply wood glue at each joint for extra strength and clamp tightly before screwing or nailing.
Step 4: Assemble the Base Frame
Build the seat base first:
- Attach the side rails between the legs
- Add front and back rails
- Ensure all corners are square using a carpenter’s square
- Screw or glue everything tightly and clamp
Now you have a strong rectangular base with four legs.
Step 5: Attach the Seat
Lay the seat slats evenly across the frame. Space them about ¼ inch apart.
- Attach using wood glue and nails or screws
- For comfort, sand the front edges slightly round
Want to add cushion? Use a plywood base with foam and fabric instead of slats.


Step 6: Build and Attach the Backrest
- Fasten vertical slats to the top of the back legs
- Add a horizontal backrest piece at the top
- Glue and screw everything tightly
Feel free to curve or shape the backrest to suit your design — Ted’s plans offer templates to trace custom styles.
Step 7: Sand Smooth
Use a palm sander or sandpaper (start with 80 grit, then go up to 220) to smooth:
- All edges and surfaces
- Joints and corners
- Bottoms of legs so the chair sits flat
Step 8: Finish the Chair
Choose your finish:
- Stain for rich, natural wood tones
- Paint for a modern or colorful look
- Clear polyurethane for durability and water resistance
Apply in a dust-free area and let dry thoroughly between coats.
Optional Add-Ons
- Add a cross-brace between legs for extra strength
- Use a contoured seat for comfort
- Add arms to create an armchair version
- Carve or engrave for personalized flair
Mistakes to Avoid (Especially for Beginners)
- Not pre-drilling holes – This can split the wood
- Skipping wood glue – Screws alone won’t hold up long-term
- Using softwood – Pine is cheap but dents easily; hardwood is better
- Forgetting to square corners – Leads to a wobbly or twisted frame
- Rushing the finish – Take your time to sand and seal correctly
✅ Want to avoid all these mistakes? Ted’s Woodworking shows each step in visual plans and video tutorials, so you’ll never feel lost.
Best Wood Types for Making Chairs
Some woods work better than others when it comes to durability and style:
| Wood Type | Pros | Cons |
|---|---|---|
| Oak | Strong, durable, classic grain | Heavy, harder to sand |
| Maple | Smooth grain, light color | Can burn during cutting |
| Pine | Cheap and easy to find | Soft and dents easily |
| Walnut | Beautiful dark tone | Expensive |
| Cherry | Ages beautifully | Costly and darkens over time |
Want to match your chair to a table or room theme? Ted’s plans include matching chair and table sets for a cohesive look.
Why Use Ted’s Woodworking Plans?
Ted’s Woodworking is the #1 resource for woodworking projects. It includes over 16,000 detailed plans — from chairs to cabins.
When you use Ted’s for building a chair:
- You get step-by-step diagrams
- Material and cut lists save trips to the store
- Learn advanced techniques with beginner-friendly explanations
- Save time and money by avoiding mistakes
- Build chairs that last for decades — not months
Whether you want to build a modern desk chair, farmhouse kitchen chairs, rocking chairs, or patio seats, Ted’s has it all.
👉 CLICK HERE to Unlock 16,000+ DIY woodworking plans now
Final Thoughts: Your First Chair Can Be the Start of a Woodworking Journey
Making your first wood chair is more than just a project — it’s a gateway into the world of craftsmanship.
Once you’ve built one, you’ll feel more confident tackling larger furniture like tables, benches, or beds. Plus, your skills (cutting, measuring, joining) will improve with every build.
So grab your tools, pick your wood, and get started — and if you want proven blueprints, diagrams, and success, turn to Ted’s Woodworking.
👉 CLICK HERE to Unlock 16,000+ DIY woodworking plans now

I get pleasure from, result in I found exactly what I used
to be having a look for. You have ended my four day long hunt!
God Bless you man. Have a nice day. Bye