How to Make a Solid Wood Chair: A Step-by-Step Guide (Updated 2026)
Solid Wood Chair: Creating a solid wood chair is a rewarding woodworking project that combines craftsmanship, creativity, and functionality. Whether you’re a seasoned woodworker or a beginner looking to enhance your skills,
this comprehensive guide will walk you through the process of making a solid wood chair from start to finish.
👉 CLICK HERE to Unlock 16,000+ DIY woodworking plans now
How to Make a Solid Wood Chair
Materials and Tools You’ll Need to Make a Solid Wood Chair
Materials:
- Wood: Choose hardwood like oak, maple, or walnut for durability and aesthetics.
- Wood Glue: For securing joints.
- Screws or Dowels: For added strength in joints.
- Sandpaper: Various grits for smoothing surfaces.
- Finish: Varnish, oil, or paint, depending on your preference.
Tools:
- Measuring Tape and Square: For precise measurements.
- Saw: Circular saw, table saw, or hand saw for cutting wood.
- Drill and Bits: For making holes and driving screws.
- Clamps: For holding pieces together while glue dries.
- Chisels and Mallet: For fine woodworking and creating joints.
- Sander: For smoothing surfaces.
- Brushes or Rags: For applying finish.
👉 CLICK HERE to Unlock 16,000+ DIY woodworking plans now
Step 1: Designing Your Chair
Before you start cutting wood, you need a clear design. Consider the following aspects:
- Style: Decide whether you want a traditional, modern, or rustic chair.
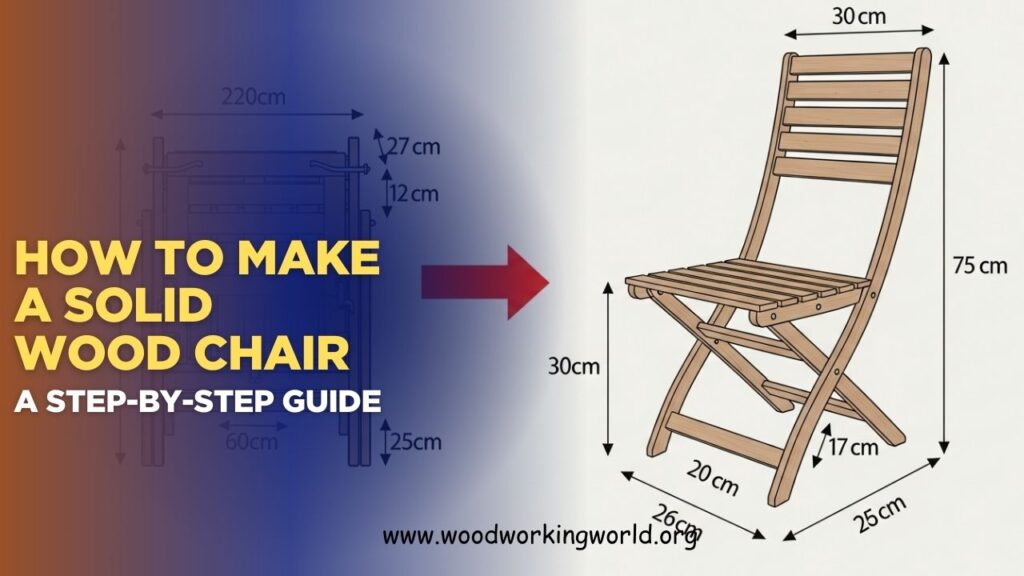
- Dimensions: Standard dining chair dimensions are approximately 18 inches for the seat height, 18-20 inches seat width, and 16-18 inches seat depth. The backrest height can vary depending on the design.
- Joinery: Decide on the types of joints you’ll use, such as mortise and tenon, dowel joints, or screws.
Sketch your design or use woodworking software to create a detailed plan. This plan will guide you through the cutting and assembly process.
Step 2: Selecting and Preparing Wood
Choosing the right wood is crucial for the durability and appearance of your chair. Hardwoods like oak, maple, and walnut are excellent choices due to their strength and beauty.
Preparation:
- Inspect the Wood: Ensure the wood is free of defects like knots, cracks, or warping.
- Cut to Size: Using your design plan, cut the wood to the required dimensions for the legs, seat, backrest, and any other components.
- Smooth the Surfaces: Sand all pieces to remove rough edges and ensure a smooth finish.
Step 3: Making the Legs and Seat Frame
Legs:
- Cut the Legs: Cut four legs to the desired height. Typically, chair legs are around 18 inches tall.
- Shape the Legs: Use a saw or router to create any desired taper or decorative elements on the legs.
- Drill Holes: If using dowels or screws, drill holes at the top of each leg where they will join the seat frame.
Seat Frame:
- Cut Frame Pieces: Cut the front, back, and side pieces for the seat frame according to your design.
- Join the Frame: Use wood glue and dowels or screws to assemble the frame, ensuring it’s square and level.
- Attach the Legs: Secure the legs to the frame using glue and screws or dowels, ensuring they are straight and aligned.


Step 4: Creating the Seat
- Cut the Seat Board: Cut a piece of wood to the dimensions of the seat.
- Smooth and Shape: Sand the seat board to remove any rough edges and shape it according to your design (e.g., rounded corners).
- Attach the Seat: Secure the seat board to the seat frame using wood glue and screws or dowels.
Step 5: Constructing the Backrest
- Cut Backrest Pieces: Cut the vertical supports and horizontal slats for the backrest.
- Shape and Sand: Smooth the pieces and shape them as desired.
- Assemble the Backrest: Use wood glue and dowels or screws to assemble the backrest, ensuring it is sturdy and square.
- Attach to the Seat Frame: Secure the backrest to the seat frame, ensuring it is straight and well-aligned.
Step 6: Final Assembly and Reinforcement
- Check Alignment: Ensure all parts of the chair are aligned and square.
- Reinforce Joints: Add additional screws or dowels to reinforce the joints as needed.
- Clamp and Dry: Use clamps to hold the chair together while the glue dries completely (usually 24 hours).
Step 7: Sanding and Finishing
Sanding:
- Coarse to Fine Grits: Start with coarse-grit sandpaper (e.g., 80 grit) and work your way up to fine-grit sandpaper (e.g., 220 grit).
- Smooth All Surfaces: Sand all surfaces of the chair until they are smooth and free of rough spots.
Finishing:
- Choose a Finish: Select a finish that suits your design, such as varnish, oil, or paint.
- Apply the Finish: Use a brush or rag to apply the finish in thin, even coats, following the manufacturer’s instructions.
- Dry and Cure: Allow the finish to dry completely between coats, and let the final coat cure according to the product instructions.
Step 8: Final Touches
- Inspect for Flaws: Check the chair for any remaining rough spots or flaws and sand or touch up as needed.
- Polish: If desired, apply a final polish or wax for added shine and protection.
Tips for Success
- Precision is Key: Accurate measurements and cuts are essential for a well-made chair.
- Quality Tools: Use sharp, high-quality tools for the best results.
- Patience: Take your time with each step to ensure the best outcome.
- Practice: If you’re new to woodworking, consider practicing on scrap wood before working on your final pieces.
👉 CLICK HERE to Unlock 16,000+ DIY woodworking plans now
Conclusion: Solid Wood Chair
Making a solid wood chair is a fulfilling project that combines skill, patience, and creativity. By following this step-by-step guide, you can create a beautiful and functional piece of furniture that will last for years to come. Whether you’re crafting a chair for your home or as a gift, the satisfaction of building something with your own hands is unmatched. Happy woodworking!
I hope this article on Solid Wood Chair has been helpful. If you have any further questions, please feel free to leave a comment below.
👉 CLICK HERE to Unlock 16,000+ DIY woodworking plans now
