How to Make a Small Wood Chair: A Step-by-Step Guide
Building a small wood chair is a fun and rewarding woodworking project—perfect if you want to craft something functional with your own hands. Whether you’re making it for a child, a decorative corner, or simply to test your skills, having clear steps makes the process smoother and more enjoyable. But where should you start, and what do you need to know before making the first cut?
In this complete step-by-step guide, we’ll walk you through everything—from choosing the right wood and preparing the pieces to assembling, sanding, and finishing your chair. You’ll also learn helpful tips, common mistakes to avoid, and the best ways to ensure your small wood chair turns out sturdy, stylish, and perfectly sized.
👉 CLICK HERE to Unlock 16,000+ DIY woodworking plans now
Why Build a Small Wood Chair?
A small wood chair may seem simple, but it teaches essential woodworking fundamentals like joinery, accuracy, balance, and strength. Unlike store-bought chairs that rely on screws and weak joints, a well-built wooden chair can last for decades.
Benefits of building your own small wood chair:
- Custom size and height for your needs
- Stronger construction using solid wood
- Lower cost than quality store-bought chairs
- Great beginner-to-intermediate woodworking project
- Builds confidence for larger furniture builds
A small chair is also an excellent gift or sellable item for craft fairs and online marketplaces.
👉 CLICK HERE to Unlock 16,000+ DIY woodworking plans now
Tools and Materials You’ll Need
Before starting, gather all tools and materials to ensure a smooth workflow.
Essential Tools
- Tape measure
- Pencil and square
- Table saw or circular saw
- Drill and drill bits
- Clamps
- Wood glue
- Chisels (optional but helpful)
- Sander or sandpaper (80–220 grit)
Materials
- Solid wood boards (pine, maple, oak, or poplar)
- Wood screws or dowels
- Wood glue
- Sandpaper
- Wood finish (oil, stain, or polyurethane)
👉 Pro Tip: Pine and poplar are ideal for beginners—they’re affordable and easy to work with.
Step 1: Plan Your Chair Dimensions
Good planning is the foundation of a strong, comfortable chair. Decide who the chair is for and how it will be used.
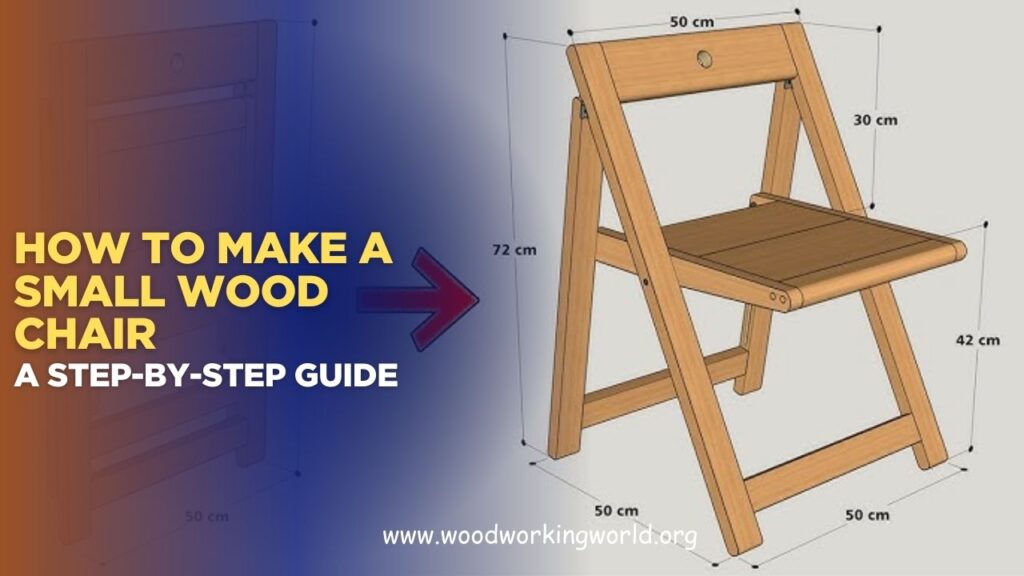
Typical Small Chair Dimensions
- Seat height: 10–14 inches (child chair) or 16–18 inches (small adult chair)
- Seat width: 12–16 inches
- Seat depth: 12–14 inches
- Backrest height: 10–14 inches above seat
Sketch your chair or use a pre-made plan to visualize the design and angles.
👉 Pro Tip: Using a detailed plan eliminates guesswork and ensures all parts fit perfectly.
Step 2: Cut the Chair Parts
Using your measurements or plan, cut all chair components before assembly.
Common Chair Parts
- 4 legs
- 2 front stretchers
- 2 side stretchers
- 1 back stretcher
- Seat panel or slats
- Backrest supports or slats
Label each piece as you cut it to avoid confusion later.
👉 Safety Tip: Always cut slightly oversized, then trim for a precise fit.
Step 3: Shape and Prepare the Legs
Chair legs are critical for stability. Make sure they are identical in length and shape.
- Square the ends carefully
- Slightly taper legs if desired for style
- Sand all surfaces before assembly
This is the best time to round edges for comfort and appearance.
Step 4: Build the Chair Frame
The frame supports the entire chair, so accuracy matters.
Assembly Process
- Attach side stretchers to the legs using glue and screws or dowels
- Connect the front and back stretchers
- Check for squareness before tightening clamps
- Let the glue cure fully
👉 Pro Tip: Use clamps generously—tight joints equal stronger furniture.
Step 5: Install the Seat
The seat can be a solid panel or multiple slats depending on your design.
Seat Installation Options
- Glue and screw from underneath
- Use pocket holes for a clean look
- Allow slight movement for wood expansion
Make sure the seat is level and secure.
Step 6: Attach the Backrest
A backrest adds comfort and structural integrity.
Backrest Tips
- Slight backward angle improves comfort
- Use vertical slats or a solid panel
- Secure firmly to rear legs
Test the chair before final tightening to ensure comfort.
Step 7: Reinforce for Strength and Stability
Chairs experience constant movement and stress, so reinforcement is essential.
Reinforcement methods:
- Corner blocks under the seat
- Extra stretchers
- Dowels instead of screws
These small additions dramatically increase durability.
Step 8: Sanding for a Professional Finish
Sanding is what separates amateur builds from professional-quality furniture.
Sanding Progression
- Start with 80–100 grit
- Move to 150 grit
- Finish with 220 grit
Sand with the grain and remove all sharp edges.
Step 9: Apply the Finish
Finishing protects the wood and enhances its beauty.
Finish Options
- Natural oil for a soft, organic look
- Stain to match existing furniture
- Polyurethane for durability
Apply thin, even coats and allow proper drying time.
👉 Pro Tip: Always test finishes on scrap wood first.


Common Mistakes to Avoid
Even skilled DIYers make mistakes when building chairs.
Avoid these common errors:
❌ Weak joints without glue
❌ Uneven leg lengths
❌ Skipping clamps during assembly
❌ Ignoring wood movement
❌ Rushing the finishing process
Patience and precision make all the difference.
DIY Small Chair vs. Store-Bought
| Feature | Store-Bought ❌ | DIY Wood Chair ✅ |
|---|---|---|
| Fit | Generic sizing | Custom dimensions |
| Strength | Often weak joints | Solid wood construction |
| Style | Limited designs | Fully customizable |
| Longevity | Short lifespan | Built to last |
| Satisfaction | Minimal | Extremely rewarding |
Building your own chair clearly wins in value and quality.
Turn This Project Into a Skill Builder
A small wood chair is more than a single project—it’s a stepping stone to larger furniture builds like benches, tables, and armchairs. Mastering chair construction improves your joinery skills and woodworking confidence.
🛠️ Why Woodworkers Love These Plans:
- 📚 16,000+ furniture and DIY projects
- ✂️ Detailed diagrams and cut lists
- 🧰 Beginner to advanced skill levels
- 💰 Build for home use or profit
- 🔥 Limited-time massive discount
👉 Get instant access to 16,000 woodworking plans and start building today
FAQs: Making a Small Wood Chair
1. Is building a chair difficult for beginners?
Not with clear plans—small chairs are beginner-friendly projects.
2. What’s the strongest joint for chairs?
Mortise-and-tenon or dowel joints provide excellent strength.
3. How long does it take to build?
Most small chairs can be built in a weekend.
4. Can I make a chair with basic tools?
Yes—many designs require only basic power tools.
5. What wood is best for chairs?
Hardwoods like oak and maple are strongest, but pine works for light use.
👉 CLICK HERE to Unlock 16,000+ DIY woodworking plans now
Final Verdict: Build Strength, Skill, and Satisfaction
Learning how to make a small wood chair is one of the most valuable woodworking experiences you can have. It teaches precision, patience, and craftsmanship—while delivering a functional, beautiful piece you can be proud of.
Key Takeaways:
- Plan carefully before cutting
- Use strong joints and clamps
- Reinforce for durability
- Sand and finish patiently
- Build with confidence and pride
👉 CLICK HERE to Unlock 16,000+ DIY woodworking plans now
