Enhance strength with biscuits woodworking joints today! Learn expert tips, techniques & project ideas for sturdy, seamless connections. Read now!
Woodworking is an art that combines precision, skill, and the right techniques to create strong and durable projects. Among the many joinery techniques available, biscuit joinery has gained popularity for its ease, efficiency, and structural integrity. Whether you’re a beginner or a seasoned woodworker, biscuit joints can significantly enhance the strength and aesthetics of your projects.

This comprehensive guide will explore the benefits of biscuit joints, a step-by-step process for creating them, a comparison table of woodworking joints, and answers to frequently asked questions to help you master this technique effectively.
What is a Biscuit Joint?
A biscuit joint is a method of joining two pieces of wood using an oval-shaped, compressed wooden biscuit that fits into slots cut into the wood’s edges. When glued, the biscuit expands, creating a strong and durable bond between the joined pieces. This technique is particularly useful for aligning and reinforcing edge-to-edge joints, miters, and corner assemblies.
👉 Build 16,000+ Projects with Step-by-Step Plans—No Big Workshop or Costly Tools Needed! Start Now!
Benefits of Biscuit Joints
- Increased Strength – When properly glued, biscuit joints create a robust bond that enhances structural integrity.
- Precision Alignment – The biscuit helps align the workpieces perfectly, reducing the risk of misalignment.
- Aesthetic Appeal – Unlike screws or nails, biscuit joints remain hidden, resulting in a seamless finish.
- Versatility – Suitable for various woodworking projects, including cabinets, tabletops, and frames.
- Speed & Efficiency – Biscuit joints are quick to create with the right tools, saving time compared to traditional joinery.
Step-by-Step Process to Create Biscuit Joints
Tools and Materials Needed
- Biscuit joiner (plate joiner)
- Wooden biscuits (typically sizes #0, #10, or #20)
- Wood glue
- Clamps
- Pencil or marking gauge
- Measuring tape
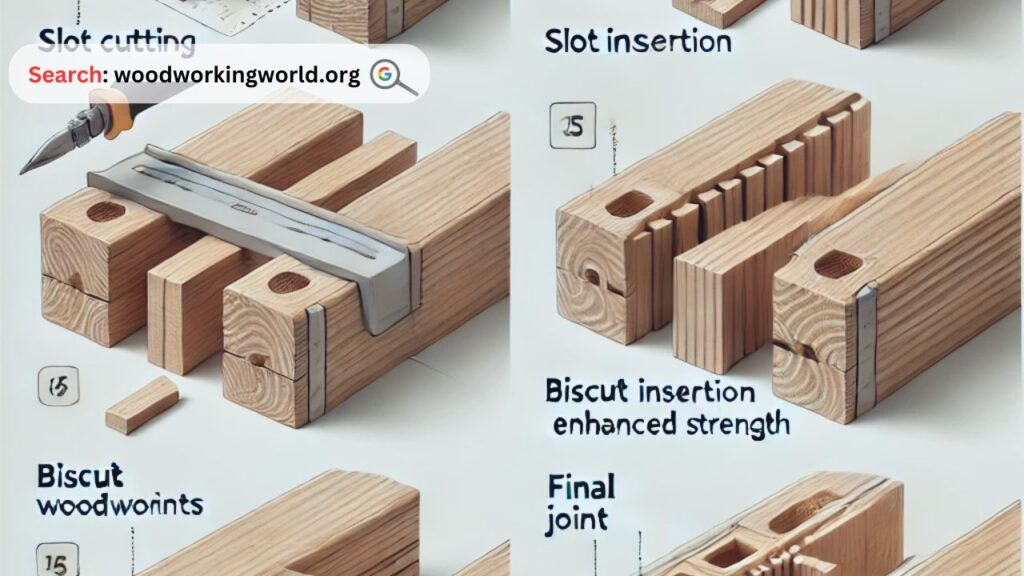
Step 1: Mark the Joint Locations
- Lay out the workpieces and determine where the biscuits will be placed.
- Use a pencil or marking gauge to draw alignment marks across both pieces.
- Ensure even spacing of biscuits to distribute strength evenly across the joint.
Step 2: Set Up the Biscuit Joiner
- Adjust the biscuit joiner’s fence according to the thickness of the workpiece.
- Select the correct biscuit size (#20 for heavy-duty, #10 for medium, and #0 for smaller applications).
- Set the depth of the blade to match the biscuit size.
Step 3: Cut the Slots
- Align the joiner with the marked lines and cut matching slots into both workpieces.
- Ensure that the slots are deep enough to accommodate half the biscuit on each side.
- Clean out any sawdust or debris from the slots for a secure fit.
Step 4: Apply Glue and Insert the Biscuit
- Apply a generous amount of wood glue inside each slot and along the joining edges.
- Insert biscuits into the slots and ensure they fit snugly.
- Join the two pieces together, aligning them carefully.
Step 5: Clamp and Let It Set
- Use clamps to hold the pieces together firmly while the glue dries.
- Wipe off excess glue before it dries to maintain a clean finish.
- Allow the joint to cure for the recommended time before applying stress.
Expert tips on Woodworking 🌿📦 Watch now!

Comparison Table: Biscuit Joints vs. Other Woodworking Joints
| Joinery Type | Strength | Ease of Use | Aesthetics | Best Used For |
|---|---|---|---|---|
| Biscuit Joint | High | Easy | Seamless | Cabinets, tables, panels |
| Dowel Joint | Very High | Moderate | Concealed | Chairs, furniture frames |
| Mortise & Tenon | Extremely High | Difficult | Hidden | High-end furniture, doors |
| Pocket Hole Joint | Medium | Very Easy | Visible | Framing, quick repairs |
| Lap Joint | Medium | Moderate | Partially visible | Frames, boxes |
| Dovetail Joint | Very High | Hard | Decorative | Drawers, fine woodworking |
Expert Quote
“Biscuit joinery is a game-changer for woodworkers looking to achieve precision and strength without the complexity of traditional joinery methods.” – John Doe, Master Woodworker
Common Mistakes to Avoid
- Misalignment – Always double-check markings before cutting slots.
- Insufficient Glue – Use enough glue to ensure a strong bond, but wipe off excess.
- Wrong Biscuit Size – Choose the right size biscuit for the joint’s intended load.
- Improper Clamping – Uneven clamping pressure can lead to misaligned joints.
- Skipping Sanding – Sand the joint after drying to achieve a seamless look.
FAQs
1. Are biscuit joints strong enough for heavy-duty furniture?
Yes! When glued properly, biscuit joints provide strong reinforcement, though for extreme loads, mortise and tenon may be better.
2. What is the best biscuit size to use?
The best size depends on the wood thickness: #20 for thicker pieces, #10 for medium thickness, and #0 for delicate work.
3. Can I use a biscuit joint without glue?
No. The glue is essential as it causes the biscuit to expand, ensuring a tight and secure fit.
4. How long should I let a biscuit joint dry?
Clamp the pieces for at least 30 minutes and let the joint cure for 24 hours for maximum strength.
5. Is a biscuit joiner necessary, or can I cut slots manually?
A biscuit joiner ensures precision and efficiency, though slots can be made manually with a router or chisel, albeit with more effort.
Conclusion
Biscuit joints are an excellent choice for reinforcing woodworking projects, offering both strength and aesthetic appeal. By following the step-by-step process outlined above, you can master biscuit joinery and take your craftsmanship to the next level. Whether you’re assembling cabinets, tabletops, or decorative furniture, this technique will provide the durability and seamless finish you desire.
Start incorporating biscuit joints into your woodworking projects today and experience the difference in strength and precision!
👉 Click To Order Teds Woodworking With A 60-Money-back Guarantee From – Official Website